目次
Let's Encrypt証明書取得 クイックセットアップ
2019/01/08
Let's Encrypt証明書取得 クイックセットアップ2019年版の方が簡単かも。
2016/09/10
現在 letsencrypt-autoコマンド は certbot-autoコマンドに名称変更されていて、オプションにもいくつか変更が入っています。適宜読み替えしてください。あと証明書取得・更新について修正。
2015/12/20
Let's Encrypt 総合ポータルの説明に沿ってFreeBSDで hgotoh.jp のサーバ証明書を取得しApache2.4への設定を行うメモ。
手順
ほとんどはLet's Encrypt の使い方の参照で解決する。
- OpenSSL再構築
- github.comリポジトリからクライアント取得
- certbot-auto コマンドで証明書取得
- Apache2.4へのサーバ証明書組み込み
- certbot-auto コマンドで証明書更新
なお、証明書を発行する対象のサービスが動作してるサーバが既に存在し、DNSで正引きが可能なっている必要がある。
※クライアントは証明書を取得したい(サービスを稼働させたい)サーバで実行することになる。
OpenSSL再構築
gitコマンド実行時、
environment corrupt; missing value for BLOCKSIZ?
のようなメッセージが出てエラーになるなら、OpenSSLの再構築が必要。どうやら既知の問題らしく、Postfix does not start/build anymore since upgrade to OpenSSL 1.0.2のような情報がある。
gitコマンドで指定するURLが https: から始まるのでたぶんOpenSSL関連ライブラリの問題なのかなと思う。
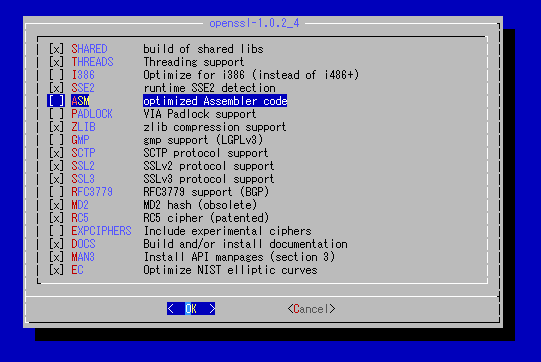
情報に従い、ビルドオプションから ASM を外してみるとエラーは出なくなった。
github.comリポジトリからクライアント取得
管理フォルダを決めて、そこにletsencryptクライアントを取得する。取得にはgitコマンドを使用するのでこちらは先に導入しておく。 以下は letencript-autoコマンドの時代に取得したログ。
root@crusade:/home/letencript # git clone https://github.com/letsencrypt/letsencrypt
root@crusade:/home/letencript # cd letsencrypt
root@crusade:/home/letencript/letsencrypt # ./letsencrypt-auto --server https://acme-v01.api.letsencrypt.org/directory --help
grep: /etc/os-release: No such file or directory
WARNING: FreeBSD support is very experimental at present...
if you would like to work on improving it, please ensure you have backups
and then run this script again with the --debug flag!
root@crusade:/home/letencript/letsencrypt #
『–debugオプションつけてくれない?』と言われるのでつけて実行してみる。
足りないものや古いものはパッケージからインストールしたりとタスクが動くので、適宜指示回答する。以下のログはうちの環境での話なので、他の環境では当然異なった結果となる。
root@crusade:/home/letencript/letsencrypt # ./letsencrypt-auto --debug --server https://acme-v01.api.letsencrypt.org/directory --help
grep: /etc/os-release: No such file or directory
Bootstrapping dependencies for FreeBSD...
+ pkg install -Ay git python py27-virtualenv augeas libffi
Updating FreeBSD repository catalogue...
Fetching meta.txz: 100%    944 B   0.9kB/s    00:01
Fetching packagesite.txz: 100%    5 MiB   1.8MB/s    00:03
Processing entries: 100%
FreeBSD repository update completed. 24029 packages processed.
Updating database digests format: 100%
The following 4 package(s) will be affected (of 0 checked):

New packages to be INSTALLED:
        py27-virtualenv: 13.1.0
        augeas: 1.4.0

Installed packages to be REINSTALLED:
        git-2.6.4 (direct dependency changed: p5-Error)
        python-2.7_2,2 (ABI changed: 'freebsd:9:x86:64' -> 'freebsd:10:x86:64')

The process will require 6 MiB more space.
6 MiB to be downloaded.
Fetching git-2.6.4.txz: 100%    3 MiB   1.2MB/s    00:03
Fetching python-2.7_2,2.txz: 100%    996 B   1.0kB/s    00:01
Fetching py27-virtualenv-13.1.0.txz: 100%    2 MiB 695.7kB/s    00:03
Fetching augeas-1.4.0.txz: 100%  575 KiB 588.3kB/s    00:01
Checking integrity... done (0 conflicting)
[1/4] Reinstalling git-2.6.4...
Updating /etc/shells
==> You should manually remove the "git_daemon" user.
===> Creating users and/or groups.
Using existing group 'git_daemon'.
Using existing user 'git_daemon'.
[1/4] Extracting git-2.6.4: 100%
Updating /etc/shells
[2/4] Reinstalling python-2.7_2,2...
[2/4] Extracting python-2.7_2,2: 100%
[3/4] Installing py27-virtualenv-13.1.0...
[3/4] Extracting py27-virtualenv-13.1.0: 100%
[4/4] Installing augeas-1.4.0...
[4/4] Extracting augeas-1.4.0: 100%
Message from git-2.6.4:
------------------------------------------------------------------------
*************************** GITWEB *************************************
If you installed the GITWEB option please follow these instructions:

In the directory /usr/local/share/examples/git/gitweb you can find all files to
make gitweb work as a public repository on the web.

All you have to do to make gitweb work is:
1) Copy the files /usr/local/share/examples/git/gitweb/* to a directory on
   your web server (e.g. Apache2) in which you are able to execute
   CGI-scripts.
2) In gitweb.cgi, adjust the variable $projectroot to point to
   your git repository (that is where you have your *.git project
   directories).
*************************** GITWEB *************************************

*************************** CONTRIB ************************************
If you installed the CONTRIB option please note that the scripts are
installed in /usr/local/share/git-core/contrib. Some of them require
other ports to be installed (perl, python, etc), which you may need to
install manually.
*************************** CONTRIB ************************************
------------------------------------------------------------------------
Creating virtual environment...
Updating letsencrypt and virtual environment dependencies...You are using pip version 7.1.0, however version 7.1.2 is available.
You should consider upgrading via the 'pip install --upgrade pip' command.
.You are using pip version 7.1.0, however version 7.1.2 is available.
You should consider upgrading via the 'pip install --upgrade pip' command.
...
Running with virtualenv: /root/.local/share/letsencrypt/bin/letsencrypt --debug --server https://acme-v01.api.letsencrypt.org/directory --help

  letsencrypt [SUBCOMMAND] [options] [-d domain] [-d domain] ...

The Let's Encrypt agent can obtain and install HTTPS/TLS/SSL certificates.  By
default, it will attempt to use a webserver both for obtaining and installing
the cert. Major SUBCOMMANDS are:

  (default) run        Obtain & install a cert in your current webserver
  certonly             Obtain cert, but do not install it (aka "auth")
  install              Install a previously obtained cert in a server
  revoke               Revoke a previously obtained certificate
  rollback             Rollback server configuration changes made during install
  config_changes       Show changes made to server config during installation
  plugins              Display information about installed plugins

Choice of server plugins for obtaining and installing cert:

  --apache          Use the Apache plugin for authentication & installation
  --standalone      Run a standalone webserver for authentication
  (nginx support is experimental, buggy, and not installed by default)
  --webroot         Place files in a server's webroot folder for authentication

OR use different plugins to obtain (authenticate) the cert and then install it:

  --authenticator standalone --installer apache

More detailed help:

  -h, --help [topic]    print this message, or detailed help on a topic;
                        the available topics are:

   all, automation, paths, security, testing, or any of the subcommands or
   plugins (certonly, install, nginx, apache, standalone, webroot, etc)

root@crusade:/home/letencript/letsencrypt #
certbot-auto コマンドで証明書取得
初めてLet's Encryptを使うのであれば、standaloneプラグインを使う方が分かり易いかと思う。
standaloneプラグインを使い取得
Webサーバの代わりにcertbot-autoコマンドで80番ポートをListenする簡易なWebサーバを実行するため先にapacheを止めておく。
serviceコマンドからでもいいし、/usr/local/.etc/rc.d/apache24 stop でもいい。
root@crusade:/home/letencript/letsencrypt # service apache24 stop
そしてcertbot-autoコマンドを実行。説明によればコマンドの実行時にクライアントのアップデートを自動実行するとある。
以下は letencript-autoコマンドの時代に取得したログ。
root@crusade:/home/letencript/letsencrypt # ./letsencrypt-auto certonly -a standalone -d hgotoh.jp -d www.hgotoh.jp
Updating letsencrypt and virtual environment dependencies.......
Running with virtualenv: /root/.local/share/letsencrypt/bin/letsencrypt certonly -a standalone -d hgotoh.jp -d www.hgotoh.jp

IMPORTANT NOTES:
 - Congratulations! Your certificate and chain have been saved at
   /etc/letsencrypt/live/hgotoh.jp/fullchain.pem. Your cert will
   expire on YYYY-MM-DD. To obtain a new version of the certificate in
   the future, simply run Let's Encrypt again.
 - If like Let's Encrypt, please consider supporting our work by:

   Donating to ISRG / Let's Encrypt:   https://letsencrypt.org/donate
   Donating to EFF:                    https://eff.org/donate-le

root@crusade:/home/letencript/letsencrypt #
YYYY-MM-DD が取得したサーバ証明書の有効期限になる。コマンド実行日から90日後の日付になっている。また、途中いくつか確認のダイアログが出る。
メールアドレスの確認。
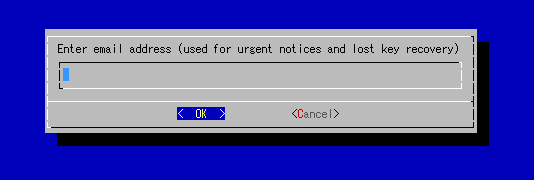
期限切れ間近だったりすると、このメールアドレスに連絡が来る。また証明書の再発行などでもこのメールアドレスは利用する。捨てアドではなく専用にアドレスを作った方がいい。
利用規約への同意。
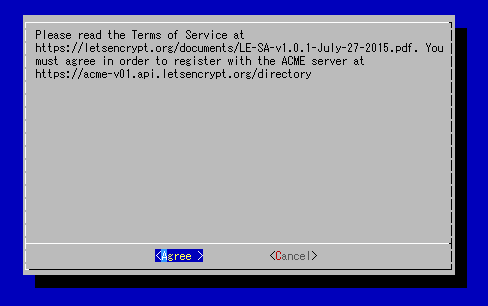
指定URLにPDFで利用規約が公開されているのでそちらにアクセスし規約を理解した上で「Agree」を選択。
実行が終了すると、以下の証明書群が作成されている。
| 生成物 | ファイル名 |
|---|---|
| サーバ証明書(公開鍵) | /etc/letsencrypt/archive/hgotoh.jp/cert1.pem |
| サーバ証明書シンボリックリンク | /etc/letsencrypt/live/hgotoh.jp/cert.pem |
| 中間証明書 | /etc/letsencrypt/archive/hgotoh.jp/chain1.pem |
| 中間証明書シンボリックリンク | /etc/letsencrypt/live/hgotoh.jp/chain.pem |
| サーバ証明書と中間証明書が結合されたファイル | /etc/letsencrypt/archive/hgotoh.jp/fullchain1.pem |
| 結合されたファイルのシンボリックリンク | /etc/letsencrypt/live/hgotoh.jp/fullchain.pem |
| 秘密鍵 | /etc/letsencrypt/archive/hgotoh.jp/privkey1.pem |
| 秘密鍵シンボリックリンク | /etc/letsencrypt/live/hgotoh.jp/privkey.pem |
1回目は cert1.pem、2回目は cert2.pem、のように取得するごとにファイル名に数字が振られ、最新版の証明書ファイル名には大きい数字が振られる。
そしてシンボリックリンクは最新版の証明書ファイルを指すように修正される。
Apacheではこのシンボリックリンクを参照するように設定するのが楽。httpd.conf等の修正がいらないので。
注意!
秘密鍵は絶対に外部に晒すようなことをしてはいけない。間違ってもDocumentRoot配下やAliasを指定したディレクトリに配置したりしないように。
Apache2.4へのサーバ証明書組み込み
httpd.conf にあるSSL関連モジュールのコメントアウトを外して有効にする。
LoadModule socache_shmcb_module libexec/apache24/mod_socache_shmcb.so
LoadModule ssl_module libexec/apache24/mod_ssl.so
:
:
:
Include etc/apache24/extra/httpd-ssl.conf
extra/httpd-ssl.conf に以下を追加し、SSLを使うサイトの設定を行う。
ここの定義で取得した証明書の利用を定義する。中間証明書 chain.pem ではなく、fullchain.pemを指定することに注意。
なお、以下は例であり、実際に hgotoh.jp で定義しているものから変更・削除している部分がある。
<VirtualHost hgotoh.jp:443>
  DocumentRoot "/usr/local/www/apache24/datamater"
  ServerName hgotoh.jp:443
  ServerAdmin hoge@hgotoh.jp

  SSLEngine on
  SSLCertificateFile      "/etc/letsencrypt/live/hgotoh.jp/fullchain.pem"
  SSLCertificateKeyFile   "/etc/letsencrypt/live/hgotoh.jp/privkey.pem"

  <IfModule log_config_module>
    LogFormat "%h %l %u %t \"%r\" %>s %b \"%{Referer}i\" \"%{User-Agent}i\" \"%t %h %{SSL_PROTOCOL}x %{SSL_CIPHER}x\"  \"%r\" %b" combined
    ErrorLog "/var/log/httpd-error.log"
    TransferLog "/var/log/httpd-access.log"
    CustomLog "|/usr/local/sbin/rotatelogs /var/log/httpd-ssl_access.log 2592000 540" combined
  </IfModule>

  <Directory "/usr/local/www/apache24/wiki">
      AllowOverride All
      Options +Indexes -FollowSymLinks
      Require all granted
      SSLOptions +StdEnvVars
  </Directory>

  <IfModule alias_module>
      Alias /wiki /usr/local/www/apache24/wiki
  </IfModule>

  BrowserMatch "MSIE [2-5]" \
         nokeepalive ssl-unclean-shutdown \
         downgrade-1.0 force-response-1.0

</VirtualHost>
ここまでできたら、apacheを起動する。
serviceコマンドからでもいいし、/usr/local/.etc/rc.d/apache24 start でもいい。
root@crusade:/home/letencript/letsencrypt # service apache24 start
certbot-auto コマンドで証明書更新
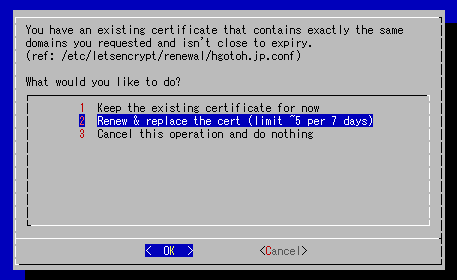
あまり頻繁な更新をやるとサービスから締め出されるかもしれない。ダイアログにあるように7日間で5回を超えるような更新はやめておく。 ポータルの説明では60日間ごとの更新を推奨している。
サブコマンド certonly を使う場合
- updatecert.sh
#!/bin/sh
cd /home/letencript/letsencrypt
service apache24 stop
./certbot-auto certonly --standalone --renew-by-default -d hgotoh.jp -d www.hgotoh.jp
service apache24 start
Webサーバが止まっていないと使えないのは証明書取得の時と同じ。
以下のダイアログが出てくるので、“Renew & replace the cert” を選択する。
cron等でバックグラウンド実行させるなら、SSL/TLS サーバ証明書の更新に記載のあるオプション –renew-by-default を追加する。
サブコマンド certonly + webrootプラグイン を使う場合
結局はApacheに再読み込みさせる必要があってダウンタイムが発生するんだけど、ギリギリまでApacheを動かしておけるので、webrootプラグインを使う方がいいかと思う。
* Let's Encrypt 総合ポータル プラグイン Webroot
root@crusade:/home/letencript/letsencrypt # ./certbot-auto certonly --webroot -w /usr/local/www/apache24/data/ -d hgotoh.jp -d www.hgotoh.jp
WARNING: unable to check for updates.

IMPORTANT NOTES:
 - Congratulations! Your certificate and chain have been saved at
   /etc/letsencrypt/live/hgotoh.jp/fullchain.pem. Your cert will
   expire on 2016-12-09. To obtain a new or tweaked version of this
   certificate in the future, simply run certbot-auto again. To
   non-interactively renew *all* of your certificates, run
   "certbot-auto renew"
 - If you like Certbot, please consider supporting our work by:

   Donating to ISRG / Let's Encrypt:   https://letsencrypt.org/donate
   Donating to EFF:                    https://eff.org/donate-le

root@crusade:/home/letencript # service apache24 reload
Performing sanity check on apache24 configuration:
Syntax OK
Performing sanity check on apache24 configuration:
Syntax OK
Performing a graceful restart
root@crusade:/home/letencript #
-w オプションで指定したWebサーバのドキュメントルートにディレクトリ .well-known が作成され、certbot-auto コマンド実行時に必要なデータが格納される模様。
コマンド実行が終わるとディレクトリ .well-knownの下はきれいに掃除されている。
ディレクトリ /etc/letsencrypt/archive/hgotoh.jp/ を確認すると、新しい証明書が増えていることを確認できる。
残念ながら証明書を更新しただけではWebサーバで更新内容が反映されないため、Webサーバに設定を再読み込みさせる必要があるが、 停止+更新+起動ではなく、更新+再読み込み、で済むのでダウンタイムが格段に短くなる。
サブコマンド renew を使う場合
取得した証明書で、期限切れが近いものだけ更新してくれるのがサブコマンド renew。
root@crusade:/home/letencript # letsencrypt/certbot-auto renew --webroot -w /usr/local/www/apache24/data/
WARNING: unable to check for updates.

-------------------------------------------------------------------------------
Processing /etc/letsencrypt/renewal/hgotoh.jp.conf
-------------------------------------------------------------------------------

The following certs are not due for renewal yet:
  /etc/letsencrypt/live/hgotoh.jp/fullchain.pem (skipped)
No renewals were attempted.
root@crusade:/home/letencript #
先にサブコマンド certonly + webrootプラグインで更新したから更新時期は先になる。
行儀が悪いが強制的に更新してみる。
root@crusade:/home/letencript # letsencrypt/certbot-auto renew --force-renew
WARNING: unable to check for updates.

-------------------------------------------------------------------------------
Processing /etc/letsencrypt/renewal/hgotoh.jp.conf
-------------------------------------------------------------------------------

-------------------------------------------------------------------------------
new certificate deployed without reload, fullchain is
/etc/letsencrypt/live/hgotoh.jp/fullchain.pem
-------------------------------------------------------------------------------

Congratulations, all renewals succeeded. The following certs have been renewed:
  /etc/letsencrypt/live/hgotoh.jp/fullchain.pem (success)
root@crusade:/home/letencript #
更新に成功したようなのであとはapacheに設定を再読み込みさせて終了。ブラウザで証明書が更新されていることも確認した。
サブコマンド renew を使う場合の注意
最初のcertbot-autoコマンドでオプションに –webroot -w /usr/local/www/apache24/data/ を指定していたのに、強制更新の時には指定しなかった理由。
certbot-autoコマンドは指定されたプラグインやその他オプション指定を、この例だとファイル /etc/letsencrypt/renewal/hgotoh.jp.conf に記録していて、必要なオプションが省略された場合このファイルから読み出して補完するようだ。
なので、1回目のcertbot-autoコマンドに指定したプラグインやオプションを2回目では省略できている。便利といえば便利だが、一度でも違うオプション指定をすると、前の省略時設定を当てにしていた定型処理などで影響が出るという事でもある。
例えば、
root@crusade:/home/letencript # letsencrypt/certbot-auto certonly -d hgotoh.jp -d www.hgotoh.jp
を実行した後に
root@crusade:/home/letencript # letsencrypt/certbot-auto renew
を実行するとこんなふうに怒られてしまう。
root@crusade:/home/letencript # letsencrypt/certbot-auto renew
WARNING: unable to check for updates.

-------------------------------------------------------------------------------
Processing /etc/letsencrypt/renewal/hgotoh.jp.conf
-------------------------------------------------------------------------------

-------------------------------------------------------------------------------
The program httpd (process ID 69125) is already listening on TCP port 80. This
will prevent us from binding to that port. Please stop the httpd program
temporarily and then try again. For automated renewal, you may want to use a
script that stops and starts your webserver. You can find an example at
https://letsencrypt.org/howitworks/#writing-your-own-renewal-script.
Alternatively you can use the webroot plugin to renew without needing to stop
and start your webserver.
-------------------------------------------------------------------------------
2016-09-10 12:23:11,731:WARNING:certbot.renewal:Attempting to renew cert from /etc/letsencrypt/renewal/hgotoh.jp.conf produced an unexpected error: At least one of the (possibly) required ports is already taken.. Skipping.

All renewal attempts failed. The following certs could not be renewed:
  /etc/letsencrypt/live/hgotoh.jp/fullchain.pem (failure)
1 renew failure(s), 0 parse failure(s)
root@crusade:/home/letencript #
前回の実行がstandaloneプラグインによるものだったので、省略時指定もstandaloneによるものだと解釈されてしまい、80番ポート使ってるプロセス(Webサーバ)がいるから実行できないと文句を言われている。
certbot-autoコマンドを cronで実行させるような場合、オプションは省略せず、–webroot オプション、 -w オプションを付与しておく方が良い。
ポータルの説明だと、サブコマンド renew にオプションを付けないで実行する例しかなかったんで、嵌る人が出るだろうな、と思った。自分もその一人だし。